

How To Install Plex Linux
Today nosotros are going to larn that how to install Plex Media Server on Ubuntu xviii.04. Before going to installation procedure let's have a short introduction about Plex Media Server.
Plex is an Open Source software by which you tin can easily manage your Videos, Tv set shows, Music lists, Images and much more with the elegant interface. Information technology too stream these media files on your Computer, Smartphones, TV and other such devices using the Network.
So, just follow the below steps to easily install the Plex Media Server on your Ubuntu system.
Step ane: Update Your System
As usaul nosotros practise, update your organization by typing
sudo apt update
Step 2: Download Plex Media Server
Visit the Plex Server official release page to download the latest version of the Plex. You can as well get it using the wget control as given below
wget https://downloads.plex.tv/plex-media-server-new/one.xviii.8.2527-740d4c206/debian/plexmediaserver_1.eighteen.viii.2527-740d4c206_amd64.deb

Now, switch to the directory where package is downloaded.
cd ~/Downloads
And then run the following control to install deb package.
sudo dpkg -i plexmediaserver_1.xviii.eight.2527-740d4c206_amd64.deb

As the Plex Media Server is installed, verify the stauts of information technology by typing
sudo systemctl condition plexmediaserver
Output:
You'll see the similar output

In case information technology is not started run the given command to start its services
sudo systemctl start plexmediaserver
Footstep three: Enabling Plex Repository
Afterwards enabling the Plex repository on Ubuntu system, y'all can hands update the latest version of it. As the plex media server deb package contains a source listing file. Type the command to see a listing of files that are being installed from a package.
dpkg -L plexmediaserver
Now, open the file by running
sudo nano /etc/apt/sources.listing.d/plexmediaserver.list
Then uncomment the terminal line of the file equally seen below

Later on it save and get out the file.
Now, import the Plex Media Server public key to the apt parcel managing director.
wget -q https://downloads.plex.tv/plex-keys/PlexSign.key -O - | sudo apt-key add -

And update your organisation
sudo apt update
Pace iv: Initializing Plex Media Server
Run the below command to check the address on which Plex Media Server is listening on.
sudo netstat -lnpt | grep Plex
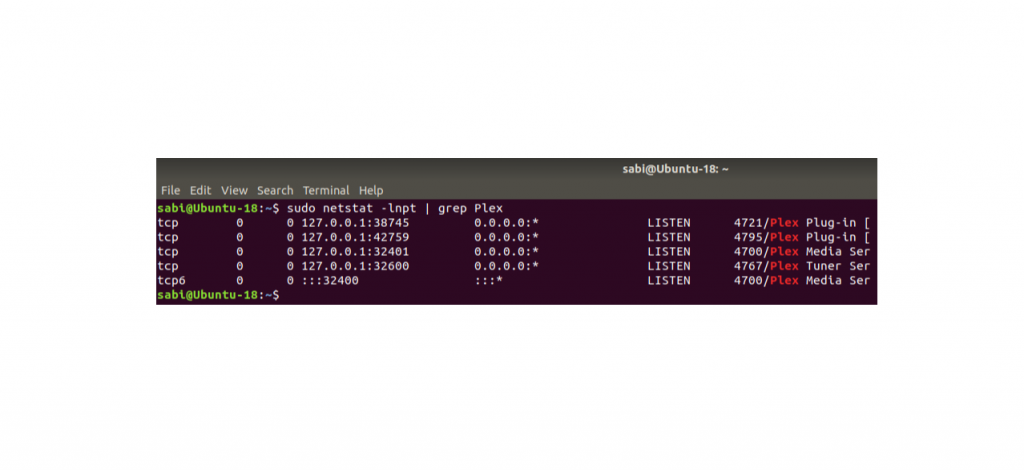
Here y'all tin run into that Plex is listening to 0.0.0.0:32400 & 127.0.0.i:32401
So, blazon 127.0.0.ane:32400 in your browser and hit enter. You lot'll be directed to the Welcome folio of Plex equally an initial setup.
Provide Plex TV Account
Hither you've to provide your Plex TV account to sign in.
For security reason, if the Plex is already installed on the remote system, gear up SSH by executing the beneath control
ssh ten.20.39.45 -50 8888:localhost:32400
Subsequently it run the below command to admission the Plex Web Interface
http://localhost:8888/web
It will redirect to the http://localhost:32400/web on the remote system by using SSH tunnel. Information technology will just crave for outset time setup. After it yous can access the web interface past IP:32400.
Note: Substitue your IP address.
Configure Plex Wizard
Later on doing these changes, you will be directed to do the initial setup.

You tin also blazon the beneath address if the above can non redirect y'all.
localhost:32400/web/index.html#!/setup
Now, provide the name for your Plex and check the Allow me to access box.

Then click on the Next button.
On, the next screen you can add library by clicking on Add Library push.

Choose your library type, and navigate to media folder to add media directories.
Make sure you've the read & execute permissions otherwise it will not piece of work. Run the control to requite permissions to the Plex.
sudo setfacl -m u:plex:rx /media/linuxbabe/
For single directory permission, run the control like this
sudo setfacl -chiliad u:plex:rx /media/linuxbabe/directory-name
As it is tempting to add together the recursive flag (-R) that volition provide read & execute permissions on each file & directories and their sub-directories.
sudo setfacl -R -m u:plex:rx /media/linuxbabe/
Do this only if you lot've the media on your difficult-drive I don't recommend if you've some sensitive information.
After adding the media directories click on the Next push.
Now, click on Done to finish up.
If you got whatever fault, don't worry but delete the following file & attempt to do the setup again advisedly in order to prevent any error.
sudo rm /var/lib/plexmediaserver/Library/Application\ Support/Plex\ Media\ Server/Preferences.xml
sudo systemctl restart plexmediaserver
And and so go to localhost:32400/web and claim the unclaimed server.
If y'all've your own domain name you can besides use that 1 for this purposes.
Step 5: Creating Nginx Reverse Proxy
As said earlier if y'all are going to use your domain name, you'll have to create the reverse proxy. To practice this install nginx if y'all don't have already installed.
sudo apt install nginx
After it brand a server cake config file.
sudo nano /etc/nginx/conf.d/plex.conf
Then paste the following engagement into the file.
server {
          listen lxxx;
          server_name plex.instance.com;location / {
proxy_pass http://127.0.0.1:32400;
proxy_set_header Host $host;
proxy_set_header X-Real-IP $remote_addr;
proxy_set_header X-Forwarded-For $proxy_add_x_forwarded_for;          #upgrade to WebSocket protocol when requested
proxy_set_header Upgrade $http_upgrade;
proxy_set_header Connection "Upgrade";
}
}
So save and exit the file.
Note: Replace the plex.example.com with your domain name. And don't forget to add the DNS records for sub-domain in DNS manager.
Verify that the nginx is working fine by testing the syntax
sudo nginx -t
And restart the nginx services.
sudo systemctl reload nginx
Step six: Encrypting with HTTPS
For security reasons, enable the HTTPS in order to stay secure. You lot can use certbot for this purpose.
So, install certbot & nginx plugin for certbot.
sudo apt install certbot
sudo apt install python3-certbot-nginx
Now, get the TLS certificate past running
sudo certbot --nginx --concur-tos --redirect --hsts --staple-ocsp --email [email protected] -d plex.example.com
The certificates will be installed hands & automatically then you lot can access the Plex with https function.
Stride 7: Upgrade Plex on Ubuntu
Every bit nosotros've added the repository earlier, so you can update & upgrade the Plex by running
sudo apt update
          sudo apt upgrade
          sudo systemctl restart plexmediaserver
So, this is how you tin install Plex Media Server on Ubuntu eighteen.04.

Source: https://www.osradar.com/how-to-install-plex-media-server-on-ubuntu-18-04/
Posted by: ruizdieve1946.blogspot.com
0 Response to "How To Install Plex Linux"
Post a Comment